Lawn
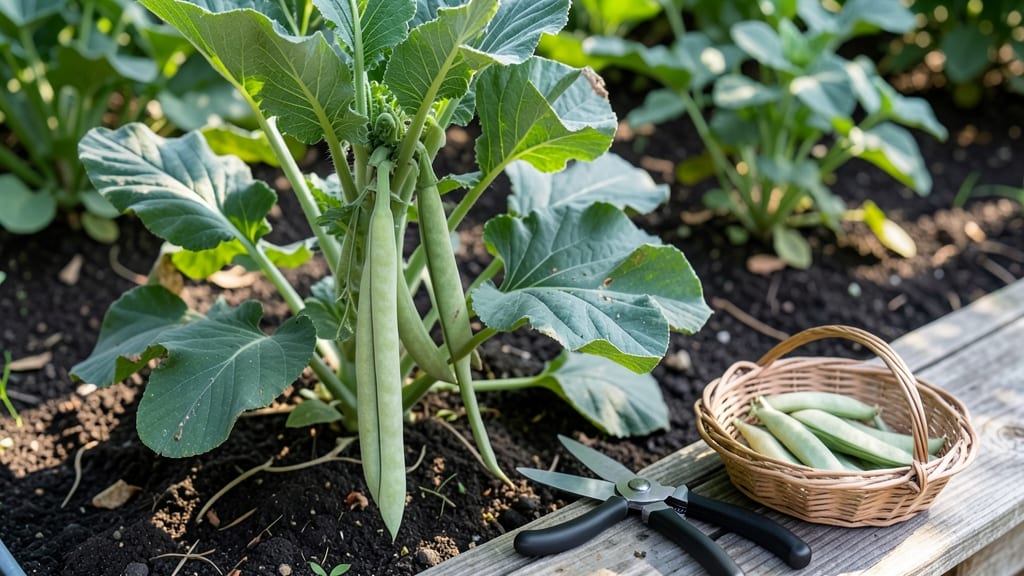
Turnip seed pods let you grow your own plants for free next season—no store-bought seeds required. 🌱 I’ve saved seeds from my garden for years, and turnips are one of the easiest crops to master.
The key is timing: pods must ripen fully before they shatter, or you’ll lose those precious seeds to the wind.
You’ll need just a few tools: sharp scissors or pruners, paper bags for drying, and a clean, dry space. Harvest pods when they turn brown and crispy—usually 60-70 days after planting.
Avoid damp conditions, as moisture ruins seed viability. Once dry, crack open the pods to release the seeds for storage.
With proper drying, your turnip seeds stay viable for up to 5 years, giving you a steady supply for future harvests. The payoff? Thicker, bushier plants that thrive because they’re grown from seeds adapted to your climate. No more guessing which varieties will do best.
This method works for both spring and fall plantings, and it’s perfect for gardeners who love self-sufficiency. Once you’ve saved your first batch, you’ll never buy turnip seeds again—and your garden will thank you for it.
📚 In This Guide
- What you need
- Instructions
- Tips and common mistakes
- Wrapping up and next steps
What you need
- ● Turnip seeds: Choose a variety like ‘Purple Top White Globe’ or ‘Tokyo Cross’ (1–2 oz per 10 sq ft). Opt for organic seeds for best results.
- ● Well-draining soil: Mix 2 parts garden soil with 1 part compost or aged manure (pH 6.0–7.0). Test soil moisture—it should feel like a damp sponge.
- ● Fertilizer: A balanced 10-10-10 or organic fertilizer (e.g., fish emulsion) to boost early growth. Use sparingly—too much nitrogen = leafy greens, fewer pods!
- ● Watering can or hose: With a fine spray nozzle for gentle hydration (avoid soggy soil).
- ● Garden trowel or transplanter: For sowing seeds ½ inch deep, 1–2 inches apart.
- ● Hand weeder or hoe: To keep weeds at bay—turnips hate competition!
- ○ Row marker or sticks: To mark planting rows (optional but helpful for neat organization).
- ● Pruning shears: For harvesting pods and trimming overgrowth.
- ● Garden gloves: To protect your hands from thorny stems (if growing wild types).
- ● Row cover or frost cloth: Extends the growing season in cooler climates.
- ● Drip irrigation kit: For consistent moisture without overwatering.
- ● Mulch (straw or grass clippings): Retains moisture and suppresses weeds.
- ● Seedling trays: For starting seeds indoors 4–6 weeks before the last frost.
Step-by-step guide to growing turnips from seed pods
Here’s how to coax those little seed pods into a thriving, bushy turnip patch—no fancy tools needed.
🌱 Step 1: Prepare the Soil for Fast Germination
Turnips love loose, fertile soil that drains well. Work in 2-3 inches of compost into the top 6 inches of soil to give roots room to spread. Break up any clumps with a garden fork—turnips hate compacted soil, which stunts their growth and makes them bitter.
Test your soil’s moisture by squeezing a handful. It should hold together lightly but not feel soggy. If it’s too dry, water deeply the day before planting. The ideal soil for turnips is slightly damp, like a wrung-out sponge. Avoid planting in heavy clay—it’ll slow germination and leave you waiting weeks for those first green shoots.
🌱 Step 2: Sow Seeds at the Right Depth and Spacing
Scatter the turnip seed pods ½ inch deep in rows 12-18 inches apart. I like to use the back of a spoon to make small furrows—it keeps seeds evenly spaced and prevents overcrowding. Planting too deep delays germination, while shallow planting risks drying out the seeds before they sprout.
After sowing, cover lightly with soil and pat down gently. Water immediately with a fine mist to settle the seeds. You’ll see tiny sprouts in 4-10 days—the faster they emerge, the bushier your plants will grow. If you’re planting in cool weather, a thin layer of straw mulch keeps soil temperatures stable and prevents crusting.
☀️ Step 3: Thin Seedlings for Stronger Roots
Once seedlings reach 2 inches tall, thin them to 3-4 inches apart in rows. Use scissors to snip unwanted sprouts at soil level—this prevents disturbing the roots of the plants you’re keeping. Overcrowded turnips compete for nutrients, resulting in small, woody roots instead of the tender, juicy ones you want.
Thinning might seem harsh, but it’s the secret to bushy growth. The remaining seedlings will have more space to develop strong foliage and deep roots. Water lightly after thinning to help the plants recover. You’ll notice within a week that the kept seedlings perk up, their leaves turning a richer green.
💧 Step 4: Water and Fertilize for Continuous Harvests
Turnips need 1-1.5 inches of water weekly, delivered consistently. Let the top 1 inch of soil dry out between waterings—this prevents rot and encourages sweetness. I water in the morning so foliage dries quickly, reducing the risk of fungal diseases like downy mildew.
Side-dress with a balanced fertilizer (10-10-10) when seedlings are 3-4 inches tall. Scatter a handful of granules around each plant and water it in. This boosts leafy growth and ensures your turnips stay tender. Avoid over-fertilizing—too much nitrogen makes the greens lush but leaves the roots small and pithy.
✂️ Step 5: Harvest at the Right Time for Peak Flavor
Baby turnips are ready to harvest when they’re 1-2 inches in diameter, about 4-6 weeks after sowing. Pull them gently by the greens—twisting can damage the root. Larger turnips (up to 3 inches) take 2-3 months and develop a slightly stronger flavor, perfect for roasting or fermenting.
Don’t wait too long—turnips left in the ground past their prime become tough and woody. The greens, however, keep producing for weeks after the roots are harvested. Snip the outer leaves as needed, leaving the inner growth to continue. This dual harvest means you get both roots and greens from a single planting.
Tips & tricks for perfect turnip seed pod growth
Growing turnips from seed pods is all about timing, soil prep, and a little patience—here's what I've learned to ensure bushy, productive plants every season.
Soil Prep Secret: The 2-3 inches of compost you work into the top 6 inches of soil isn't just about nutrients—it's about creating the perfect airy environment for those turnip roots to spread. I like to mix in a handful of perlite or coarse sand if my soil tends to compact easily. This prevents the "woody" texture that comes from roots struggling against dense soil. Think of it like giving your turnips room to stretch their legs—literally!
Planting Depth Matters: That ½-inch depth for sowing isn't arbitrary—it's the Goldilocks zone for turnip seeds. Too deep and they'll struggle to push through, too shallow and they'll dry out before sprouting. I mark my rows with a stick before planting to ensure consistent depth. Pro tip: If you're planting in cool weather, consider using a seedling heat mat for the first 7-10 days to speed up germination during those chilly spring mornings.
Thinning Technique: When you're thinning those 2-inch seedlings to 3-4 inches apart, don't just yank them out—use clean scissors to snip at soil level. This prevents disturbing the roots of your kept plants and gives you clean cuts for composting. I've found that thinning in two stages (first to 2 inches, then to 3-4 inches) reduces stress on the remaining plants. The key is to do this when seedlings are small enough that their roots haven't intertwined yet.
Watering Wisdom: The 1-1.5 inches of water weekly is your target, but how you deliver it makes all the difference. I use a soaker hose set to a gentle flow in the morning—this prevents wetting the foliage (which invites diseases) while ensuring the roots get consistent moisture. For container growing, I check soil moisture by sticking my finger in about 1 inch deep; if it's dry, that's when I water. The top inch drying out between waterings is your cue, not a rigid rule.
Pro Tips for Turnip Seed Pods
- Growing turnips from seed pods is all about timing, soil prep, and a little patience—here's what I've learned to ensu...
- Soil Prep Secret: The 2-3 inches of compost you work into the top 6 inches of soil isn't just about nutrients—it's ab...
- Planting Depth Matters: That ½-inch depth for sowing isn't arbitrary—it's the Goldilocks zone for turnip seeds. Too d...
Frequently asked questions
Got questions about growing turnip seed pods? You’re not alone! Here are some of the most common queries—plus quick, practical answers to keep your harvest thriving.
What’s the best time to plant turnip seed pods for continuous harvest?
For year-round harvests, plant turnip seed pods in early spring (as soon as soil is workable) and again in late summer (8–10 weeks before your first frost). Succession planting every 3–4 weeks ensures a steady supply.
How do I prevent turnip seed pods from bolting (going to seed too early)?
Bolting happens when plants sense heat or stress. To delay it:
- Choose cool-season varieties like ‘Tokyo Cross’ or ‘Purple Top White Globe.’
- Keep soil moist but well-drained—drought stress triggers bolting.
- Avoid overcrowding; thin seedlings to 2–3 inches apart.
- Use shade cloth (30–50%) in hot climates.
Can I grow turnip seed pods in containers? What size pot do I need?
Turnips thrive in containers with:
- A minimum 12-inch diameter pot per plant (or 1 plant per 6-inch pot if bushy varieties).
- Well-draining soil mixed with compost.
- Full sun (6+ hours daily) or partial shade in hot areas.
Why are my turnip seed pods bitter or woody? How do I fix it?
Bitterness or woodiness usually means the pods matured too long. To avoid this:
- Harvest when pods are 2–3 inches wide and tender (before seeds form).
- Plant in cooler weather (below 70°F) to slow maturation.
- Use fast-maturing varieties (40–50 days to harvest).
Are turnip seed pods a good alternative to traditional turnip greens?
Yes! While turnip greens are the leafy tops, turnip seed pods (the swollen roots) offer:
- A nutrient-dense alternative with more fiber and vitamin C.
- A longer storage life (lasts 3–4 weeks in the fridge).
- A milder, sweeter taste when harvested young.
Wrapping up and next steps
Growing turnip seed pods for a year-round harvest is totally within reach—whether you're a seasoned gardener or just starting out! 🌱 With the right soil prep, spacing, and care, you’ll enjoy bushy growth and a steady supply of fresh pods.
Remember, consistency is key: monitor moisture, rotate crops, and stay patient as your plants mature.
Ready to take the next step? Start small—plant a few pods this season, experiment with varieties, and track what thrives in your climate. Before you know it, you’ll be harvesting like a pro! Happy gardening! 🌟